In this post, PowerShell expert Tim Warner shows you how you can create a custom Azure Resource Role with PowerShell.
In my previous post I showed you how to create a custom role-based access control (RBAC) role in your Azure Active Directory (Azure AD) tenant. Today we'll accomplish the same goal, but this time for Azure subscription resource roles.
Touring built-in Azure resource roles
You might know that a single Azure AD tenant (instance) can be trusted by more than one subscription. You can use management groups to aggregate multiple subscriptions that share the same RBAC authorization requirements.
The Azure management scope hierarchy looks like this:
- Tenant root scope
- Management group
- Subscription
- Resource group
- Resource
- Resource group
- Subscription
- Management group
Thus, any RBAC assignments you make at the tenant root scope cascade by inheritance to all management groups, then subscriptions, resource groups, and ultimately resources. Log into the Azure portal as an Azure AD Global Administrator and browse to one of your owned subscriptions.
From there, click Access control (IAM), and then the Roles tab. You can see what the interface looks like in Figure 1.
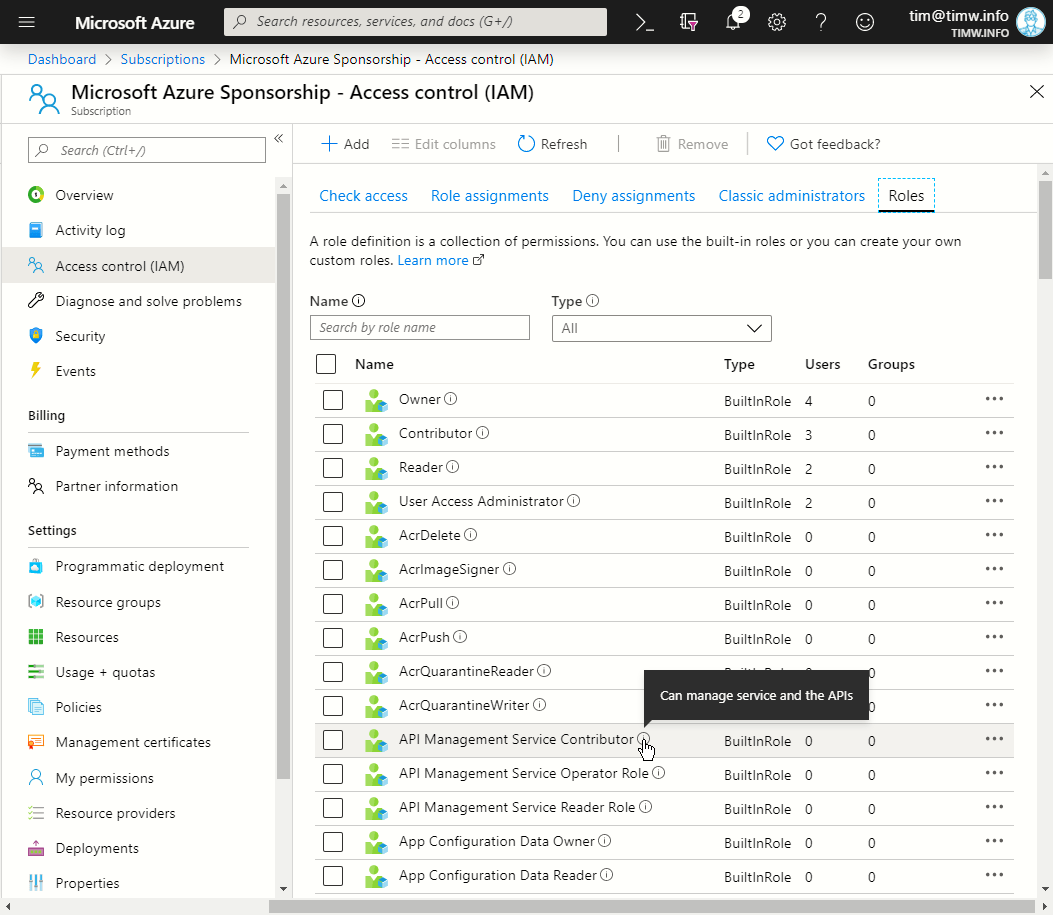
Figure 1. Listing built-in RBAC roles.
Microsoft gives you several built-in roles scoped both globally as well as to particular services. The three most important global built-in Azure resource roles are:
- Owner: Full control at that scope, including the ability to change access
- Contributor: Full control of that scope, but no ability to change access
- Reader: Read-only access at that scope
In Figure 1 notice the tooltip balloon; these can be helpful to get a quick summary of the role's purpose.
Microsoft also gives us built-in roles that grant sub-administrative access to particular Azure services. For example, you'll see Storage Account Contributor, which gives the role holder full management of the target storage account, but does not grant the ability to change RBAC assignments.
You'll find the Owner/Contributor/Reader paradigm is pretty standard across the various Azure products.
Over time you'll find in order to preserve least-privilege resource access, you'll need to create a custom Azure resource role. Whereas we can create Azure AD custom roles entirely within the Azure portal, we must do so programmatically with Azure resource custom roles.
Therefore, make sure you set up your workstation accordingly. You'll need:
- Azure PowerShell (required)
- Code editor (optional). I recommend Visual Studio Code with the PowerShell and Azure Resource Manager Tools extension
- An Azure subscription (you can sign up for a free account to get $200 service credit)
- Owner assignment to your target Azure subscription
Assuming you're running Windows 10, you can download and install Azure PowerShell by using PowerShellGet and the PowerShell Gallery:
Install-Module -Name Az- Verbose -Force
You'll then want to update your local help:
Update-Help -Force -ErrorAction SilentlyContinue
Next, we'll sign into Azure:
Connect-AzAccount
And finally, if you have multiple subscriptions, set your context:
Set-AzContext -SubscriptionName 'Microsoft Azure Sponsorship'
We're ready to rock! Let's proceed.
Defining Our Custom Role
In my experience the easiest way to create a custom role is to use an existing built-in role as your base. In this example, we'll create a custom RBAC role named Ipswitch IT Desk that we'll scope at the subscription level. This means the role will be visible at the subscription, resource group, and resource scopes.
Let's say our goal for the Ipswitch IT Desk is that the role should allow:
- Read-only access to all resources at that scope
- The ability to submit and track Microsoft Support requests
We will use the following workflow to get the job done:
- Download the definition of the Reader built-in RBAC role
- Modify the definition to include the Microsoft Support actions
- Upload the new custom role to Azure
The following PowerShell statement (a) downloads the Reader role definition; (b) converts the object to human-readable JavaScript Object Notation (JSON) format; and (c) saves the file under a new name to our local disk:
Get-AzRoleDefinition -Name 'Reader' | ConvertTo-Json | Out-File 'D:\ipswitch-it-desk.json'
To figure out which Azure Resource Manager (ARM) actions are included in filing Microsoft Support tickets, we can run Get-AzRoleDefinition:
Get-AzProviderOperation 'Microsoft.Support/*' | Format-Table -Property Operation, Description -AutoSize


Operation                              Description

---------                              -----------

Microsoft.Support/register/action      Registers Support Resource Provider

Microsoft.Support/supportTickets/read  Gets Support Ticket details

Microsoft.Support/supportTickets/write Creates or Updates a Support Ticket
All ARM operations (actions) exist in a hierarchical tree that starts with Microsoft. The Microsoft.Support resource provider includes three actions, as you see in the code snippet above. We will add the reference Microsoft.Support/* to our custom role to denote all actions (recall that the asterisk is a wildcard character in Windows).
Now open the ipswitch-it-desk.json file; we have some modifications to make. To make this process easier to describe, let me show you an annotated screenshot of my finished file and I'll describe what I did:
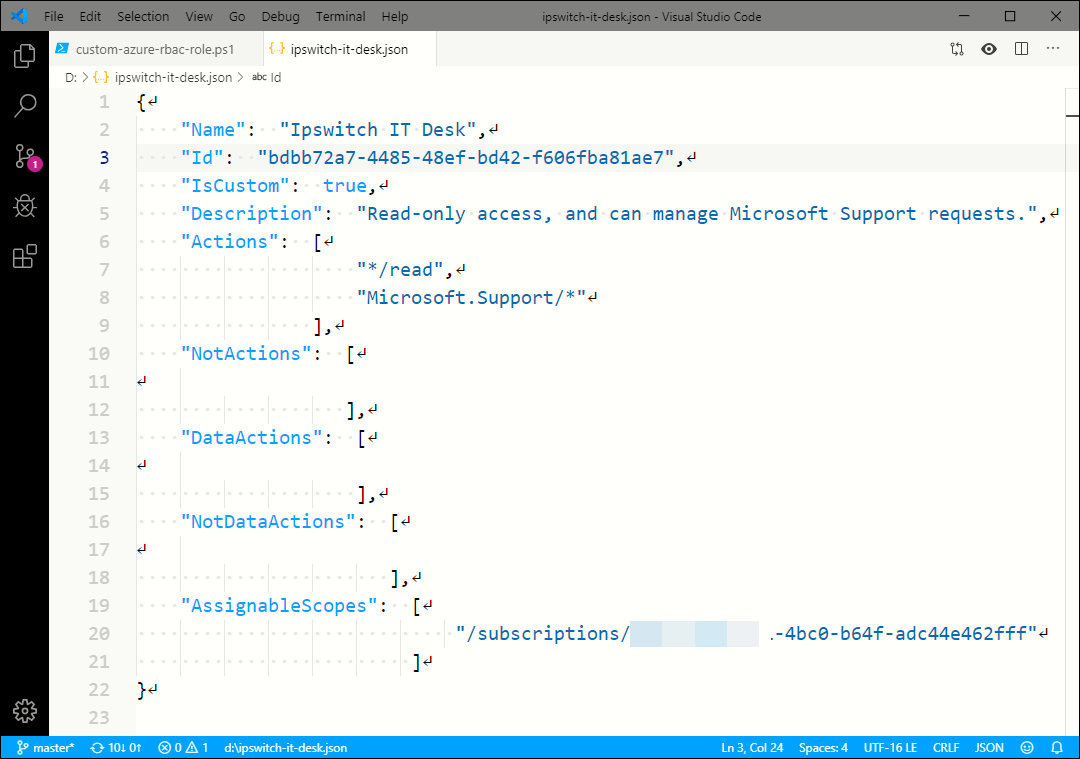 Figure 2. Custom RBAC role definition
- line 2: Replace 'Reader' with your custom role name
- line 3: Change at least a few characters; you cannot create a custom role that uses the same resource ID as an existing role
- line 4: This element needs to be changed to 'true' because it is a custom role!
- line 5: This text shows when you hover your mouse over the role's tooltip help in the Azure portal, so make it meaningful
- lines 7-8: This is a comma-separated list of Azure Resource Manager operations. Note that '*/read' allows read access to every resource provider in the assigned scope(s)
- line 20: This is a comma-separated list of management group, subscription, or resource group IDs.
To find your subscription's ID value, run the following PowerShell one-liner:
Get-AzSubscription -SubscriptionName 'Microsoft Azure Sponsorship' | Select-Object -Property id
Deploying and Testing the New Role
Run New-AzRoleDefinition to create the new RBAC role, using our locally modified JSON file as source:
New-AzRoleDefinition -InputFile 'D:\ipswitch-it-desk.json'
We can then run the following pipeline to verify our new custom role exists:
Get-AzRoleDefinition | Where-Object -FilterScript { $_.IsCustom -eq $true } | Format-Table -Property Name, IsCustom

Name                      IsCustom

----                      --------

Ipswitch IT Desk              True
You can verify (and use) your new role in the Azure portal by using the Access control (IAM) controls as usual. I show you my interface in Figure 3.
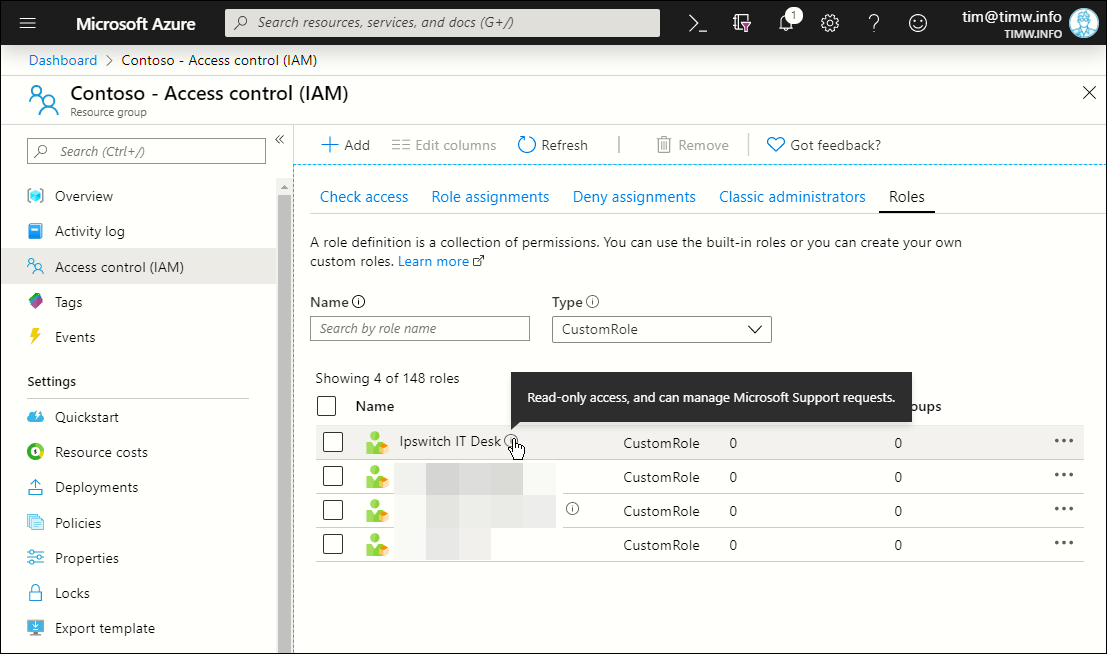 Figure 3. Viewing the custom role in Azure Portal.
Wrapping Up
What do you think? Pretty straightforward? Well, yes and no. If you have intermediate-level PowerShell skill, then what I taught you here should present no difficulty. In my experience the biggest challenge with custom RBAC roles is scoping their permissions correctly.
You should prepare yourself for debugging and iteratively re-uploading and testing your custom roles to strike a balance between least-privilege security and administrative sanity. I'll leave you with a few hand-picked references for your further study:
- Azure Resource Manager resource provider operations
- Troubleshoot RBAC for Azure resources
- Create custom roles for Azure resources using the REST API