
One of the most significant issues faced in a Microsoft Windows environment is the ability to steal credentials and utilize these credentials to move throughout the network laterally.
This task is made exceptionally easy for an adversary when a single backup local administrative set of credentials is used across an entire environment. If administrative accounts are deployed via group policy preferences, the CPASSWORD is searchable against the SYSVOL and can be easily decrypted. However, managing an individual set of local credentials for each machine is a managerial nightmare. Luckily, Microsoft has invented a solution to this problem, known as Local Administrator Password Solution (LAPS).
LAPS sets a random password for each machine which is automatically changed on a set interval. The local administrator passwords are stored as an attribute of the Computer Object in active directory and can be granularly protected via ACL. The password is protected with Kerberos encryption during transport.

Installing LAPS
LAPS has a server software application as well as an application for each client. LAPS is available at the following link: https://www.microsoft.com/en-us/download/details.aspx?id=46899
Install the LAPS server on your active directory management machine. If installing directly on Active Directory, choose to install all features on your local hard drive. Be careful not to reset your local AD admin account!
Configuring Active Directory
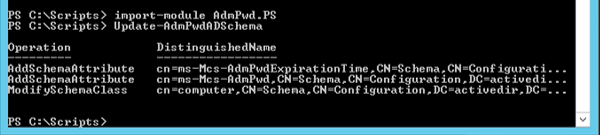
Next, you will need to extend your Active Directory schema to add two additional attributes for LAPS: ms-MCS-AdmPwd which stores the password in clear text, and ms-Mcs-AdmPwdExpirationTime which stores the password expiration time.
Next, you will need to make sure your account is a member of the Schema Admins security group. Open Powershell as an administrator and run the following commands.
Import-module AdmPwd.PS

Update-AdmPwdADSchema
Adding Machine Rights
Next, each machine must be given permission to modify the administrator password field locally. To do so, first import the ActiveDirectory module.
Import-module –name ActiveDirectory
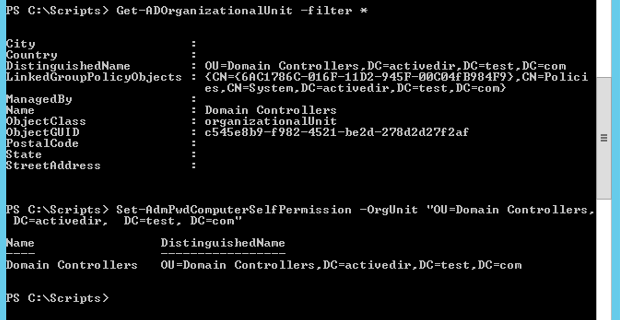
Next, you will need to obtain your AD organizational unit name. Use the following command.
Get-ADOrganizationalUnit -filter *
Finally, your will utilize the Set-AdmPwdComputerSelfPermission command to delegate the right to allow the computer object to write to the ms-MCS-AdmPwd and ms-Mcs-AdmPwdExpirationTime attributes. Use the organizational unit information found under the distinguished name field from the Get-ADOrganizationalUnit –filter * command.
Next, be sure only the accounts you wish to have ExtendedRights permissions, the accounts and groups able to read the local password for a specific OU, are listed.
Find-AdmPwdExtendedRights -identity:"OU=Computers, DC=activedir, DC=test, DC=com" | Format-Table ExtendedRightHolders

If you need to remove the permission to view the password (ms-MCS-AdmPwd) for a group or user, carry out the following.
Open ADSIEdit. Click connect to connect to the active directory.
Right Click on the OU that contains the computer accounts that you are installing this solution on and select Properties | Security | Advanced.
Edit the groups or users that should not be able to read the password.
Uncheck All extended rights.
Delegate a Security Group the Rights to View and Reset LAPS
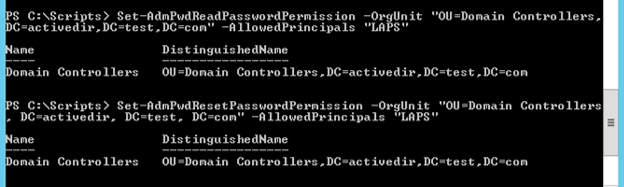
Now we will add an additional security group, LAPS, and give it the ability to read and write to the admin password field. First, in Active Directory users and computers, add a group and name it “LAPS”. Next, run the following two commands to give rights to this group.
Set-AdmPwdReadPasswordPermission -OrgUnit "OU=Computers, DC=activedir, DC=test, DC=com" -AllowedPrincipals "LAPS"

Set-AdmPwdResetPasswordPermission -OrgUnit "OU=Computers, DC=activedir, DC=test, DC=com" -AllowedPrincipals "LAPS"
This completes the setup on Active Directory.
Deploying LAPS on the Client
Each machine that will be managed by LAPS will require the client to be installed. If you wish to exclude specific machines from receiving a LAPS password, simply do not install the LAPS client. LAPS can be deployed via Group Policy, SCCM, Login Script, manual installation, or any other methodology utilized to push an installation file across the network. The command line to install the LAPS client is as follows.
msiexec /q /i \\server\share\LAPS.x64.msi
You can also create a custom admin account during setup by using the following optional command.
msiexec /q /i \\server\share\LAPS.x64.msi CUSTOMADMINNAME=LocalAdmin
If you want to deploy a new custom Local Administrator Accounts via Group Policy, due to the limitation of software installation you will need to use Orca or InstEd to generate a MST to pass the CUSTOMADMINNAME value. Edit the Property Table, and replace __null__ with the name of the Local Administrator you’d like to create.
To confirm the installation has succeeded, confirm that C:\Program Files\LAPS\CSE\AdmPwd.dll is present.
Setting up the Active Directory Central Store
To take advantage of the benefits of .admx files, you must create a Central Store in the SYSVOL folder on a Windows domain controller. The Central Store is a file location that is checked by the Group Policy tools by default. The Group Policy tools use all .admx files that are in the Central Store. The files that are in the Central Store are replicated to all domain controllers in the domain.
To create a Central Store for .admx and .adml files, create a new folder that is named PolicyDefinitions in the following location (for example) on the domain controller:
C:\Windows\SYSVOL\sysvol\activedir.test.com\Policies\Policy Definitions
Copy the following two files in to the folder above.
%WINDIR%\PolicyDefinitions\AdmPwd.admx
%WINDIR%\PolicyDefinitions\en-US\AdmPwd.adml